The oil dipstick is one of the simplest yet most vital tools in your vehicle’s engine maintenance arsenal. Despite its basic design, the dipstick provides essential information about your engine’s oil level and condition, helping prevent potential engine damage caused by low or dirty oil. Understanding how to properly use and maintain your car’s oil dipstick ensures accurate readings, allowing you to keep your engine running smoothly and extend its lifespan.
In this article, we’ll cover everything you need to know about using and maintaining your car’s oil dipstick, including step-by-step instructions, common mistakes to avoid, and maintenance tips. Plus, if you ever need a replacement, you can find quality options to buy Oil Dipstick online.
What Is an Oil Dipstick and Why Is It Important?
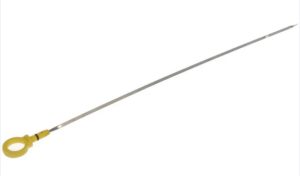
The oil dipstick is a long, thin metal rod inserted into the engine’s oil reservoir. Its primary purpose is to measure the current oil level and give an indication of oil quality. Checking your oil regularly helps:
-
Ensure sufficient oil is present to lubricate engine components
-
Detect early signs of oil contamination or degradation
-
Avoid engine wear or failure due to inadequate lubrication
Without regular oil checks, low or dirty oil can lead to overheating, increased friction, and severe engine damage.
How to Use Your Car’s Oil Dipstick Correctly: Step-by-Step Guide
To get an accurate reading from your oil dipstick, follow these steps carefully:
| Step | Instruction | Notes |
|---|---|---|
| 1 | Park your car on a level surface | This ensures oil settles evenly in the pan for accurate measurement. |
| 2 | Turn off the engine and wait a few minutes | Allow the oil to drain back into the oil pan, usually 5-10 minutes after shutting off. |
| 3 | Locate the dipstick | Usually marked with a brightly colored handle (yellow, orange) near the engine block. |
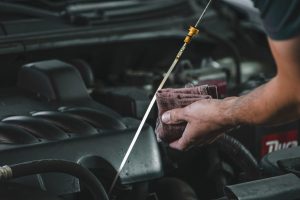
| 4 | Pull out the dipstick slowly | Wipe it clean with a lint-free cloth or paper towel to remove old oil. |
| 5 | Reinsert the dipstick fully | Push it all the way in to get a true oil level reading. |
| 6 | Remove the dipstick again and check the level | Observe where the oil film ends relative to the minimum and maximum marks. |
| 7 | Assess the oil condition | Check the oil’s color and texture; healthy oil is amber and smooth. |
Understanding Dipstick Markings
Most dipsticks have two marks or holes indicating the minimum and maximum oil levels. Here’s what they mean:
| Mark | Meaning | Action Required |
|---|---|---|
| Minimum | Lowest safe oil level | Add oil immediately if below this point |
| Maximum | Highest safe oil level | Do not overfill above this mark to avoid engine damage |
Oil level should always be between these marks for safe engine operation.
Common Mistakes to Avoid When Using the Dipstick
-
Checking oil when the engine is hot without waiting: This causes oil to be dispersed in the engine, resulting in a falsely low reading.
-
Not wiping the dipstick clean before reinserting: Old oil residue can lead to inaccurate readings.
-
Checking oil on an incline or uneven ground: Oil can shift, causing misleading levels.
-
Misreading the dipstick marks or confusing minimum and maximum levels.
How to Maintain Your Oil Dipstick for Reliable Use
Proper maintenance of your oil dipstick ensures consistent and accurate readings:
-
Keep the dipstick clean — Wipe it thoroughly every time you check oil.
-
Inspect the dipstick for damage — Bent, corroded, or cracked dipsticks can give false readings.
-
Ensure the dipstick seals properly — Some dipsticks have rubber seals; these should be intact to prevent dirt or moisture ingress.
-
Replace if necessary — If damaged or missing, replace your dipstick immediately. You can buy Oil Dipstick online from reputable suppliers.
-
Store a spare dipstick — Especially useful for older vehicles or frequent DIY maintenance.
Signs Your Engine Oil Needs Attention
Checking the dipstick helps detect not only oil quantity but also quality issues:
| Indicator | What It Means | Recommended Action |
|---|---|---|
| Oil level below minimum | Low oil level risking engine damage | Top up oil promptly |
| Oil appears very dark or black | Oil is dirty and contaminated | Schedule an oil change |
| Milky or foamy oil | Possible coolant leak into oil | Have engine inspected immediately |
| Metallic particles on dipstick | Engine wear or damage | Seek professional diagnostics |
| Strong burnt smell | Overheated or degraded oil | Replace oil and check engine cooling |
When and How Often Should You Check Your Engine Oil?
| Frequency | Situation |
|---|---|
| At least once a month | For everyday drivers, to catch issues early |
| Before long trips | Ensure oil level and condition are optimal |
| After oil changes | Confirm correct oil level after maintenance |
| More frequently in older vehicles | Older engines may consume or leak oil faster |
Summary Table: Oil Dipstick Usage and Maintenance
| Task | Frequency | Tips |
|---|---|---|
| Check oil level and condition | Monthly | Always check with a cold engine |
| Clean dipstick | Every oil check | Use lint-free cloth |
| Inspect dipstick for damage | Every 6 months | Replace if worn or bent |
| Replace dipstick | As needed | Use manufacturer recommended parts |
| Top up oil | As required | Use correct oil grade for your engine |
Final Thoughts
Your car’s oil dipstick is a simple yet indispensable tool for engine health. By regularly and correctly checking your oil level and condition, you can prevent costly repairs and keep your engine running efficiently. Maintaining the dipstick itself is equally important to ensure accurate readings every time.
If you need a new dipstick or want to upgrade your existing one, you can find quality, compatible options easily when you buy Oil Dipstick online.
Keeping up with this small task goes a long way in protecting your vehicle’s performance and longevity.